Void Linux Minimal Sway installation Book
Quick start.
If you want to know more about void Linux and how this distributions works, we highly recommend you to visit The Official Website of Void Linux Distribution to get more information about this distro.
If you see something like this, it means that command is executed as normal user:
sudo vim hello
If you see this, the command is executed as root user:
# vim hello
Installation
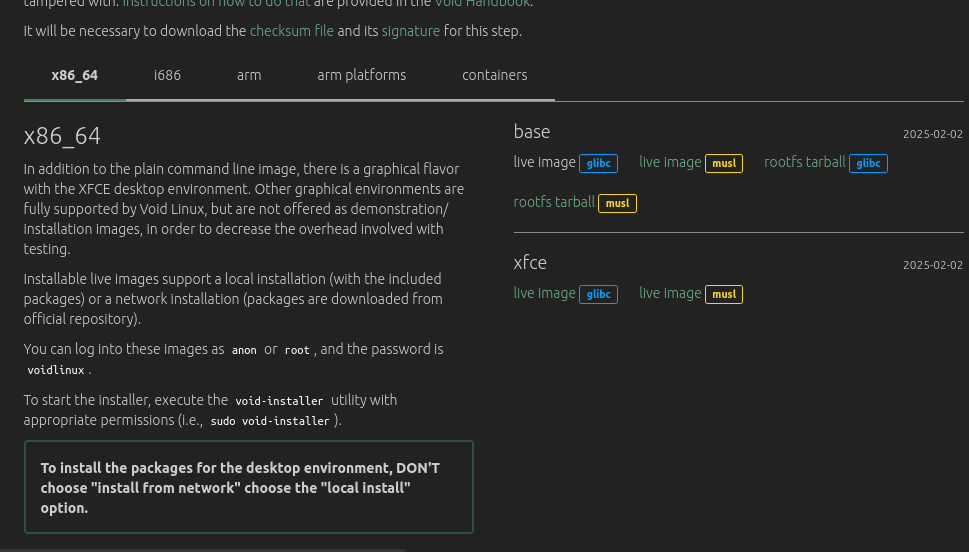
Image Selection
First we have to select the image that use glibc, this because is the image that has better integration and compatibility with all packages and available software:
In this guide we will be using [Virt Manager] with [Qemu] to execute a virtual machine.
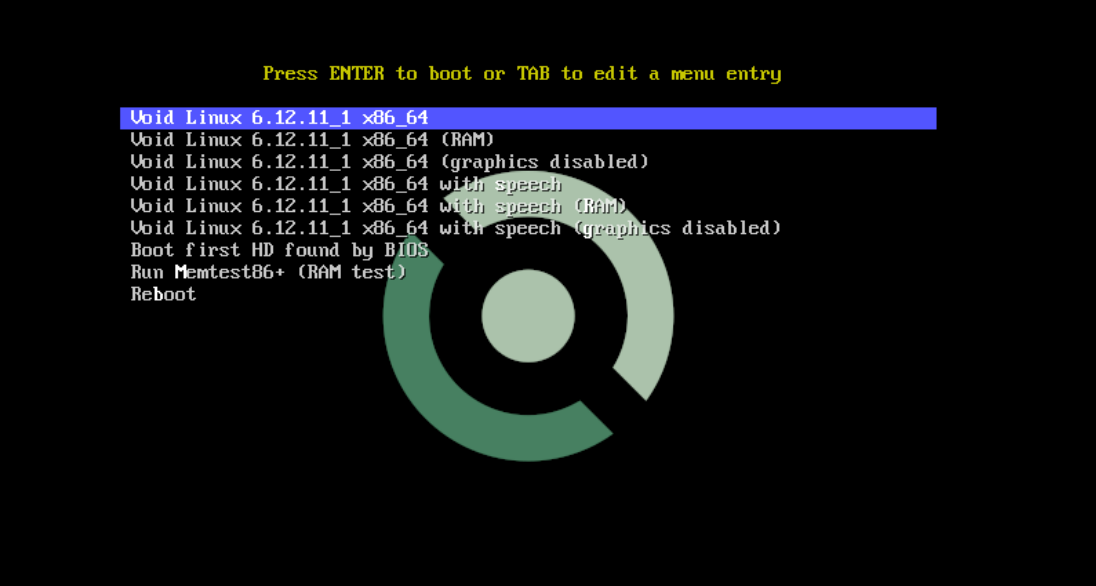
Boot Loader and install process
Image selection
Here will see many option to install base image, we will select the first one
In the first login, official [void linux documentation] indicates that you nees to login with anon user with voidlinux password:
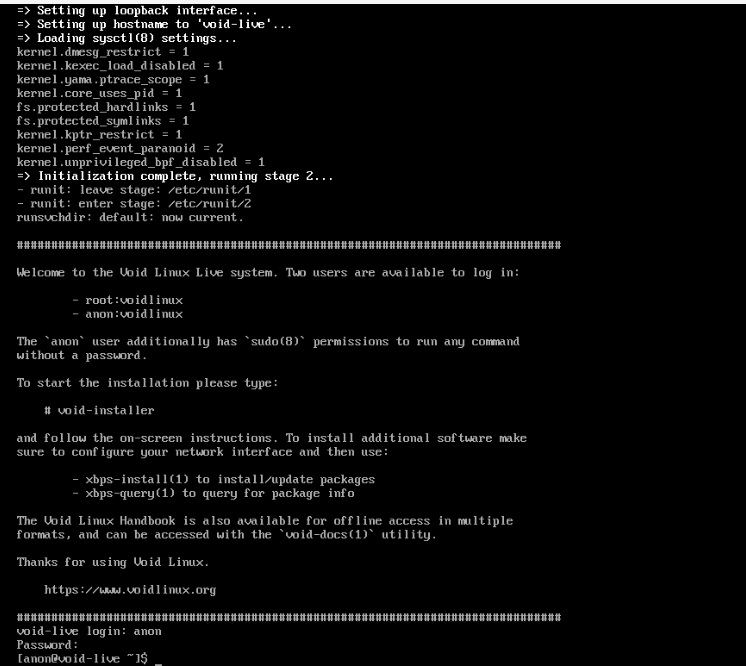
Also we can login as root using the same password
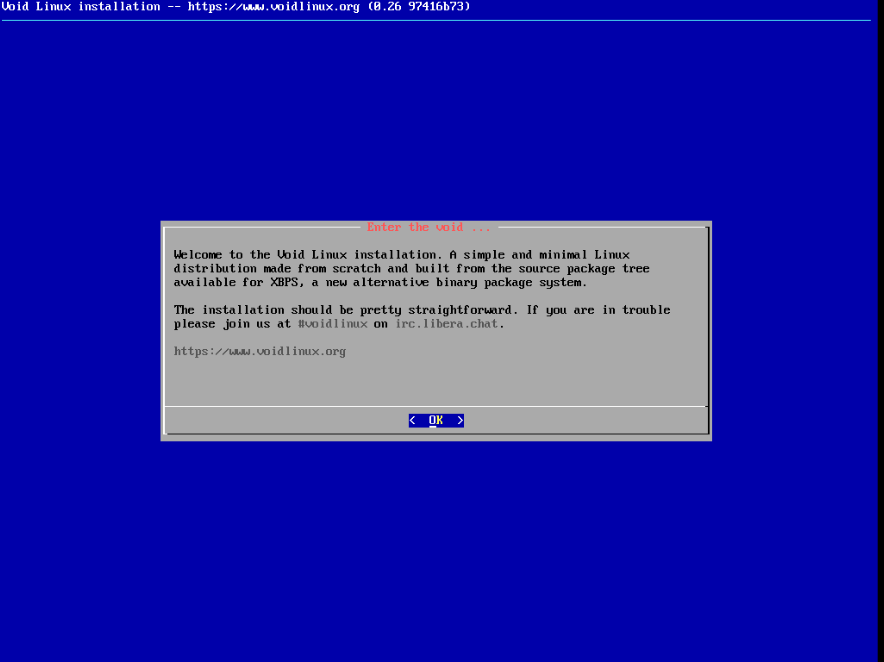
Void Installer
In this guide we will use void-installer script to install the minimal image, so we have to execute this command in root mode with su command:

Basic Installation
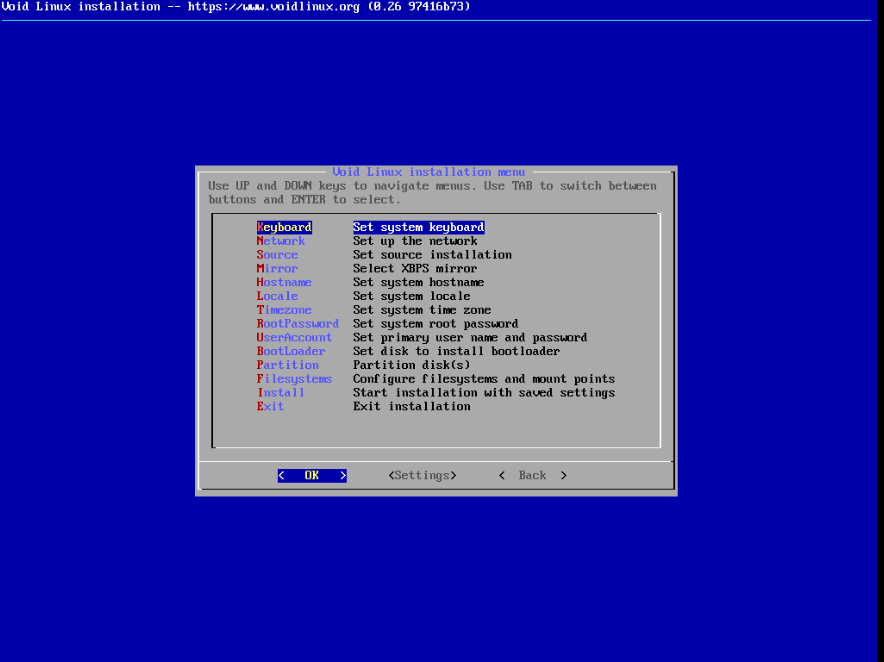
In this section you will see many option, let's see each one:
Keyboard
You have to select the distribution of your key board
Network
If you are using WiFi, you will need press the password and continue accepting dhcp configuration for your network
If you are using ethernet, it's the same process without need password
Source
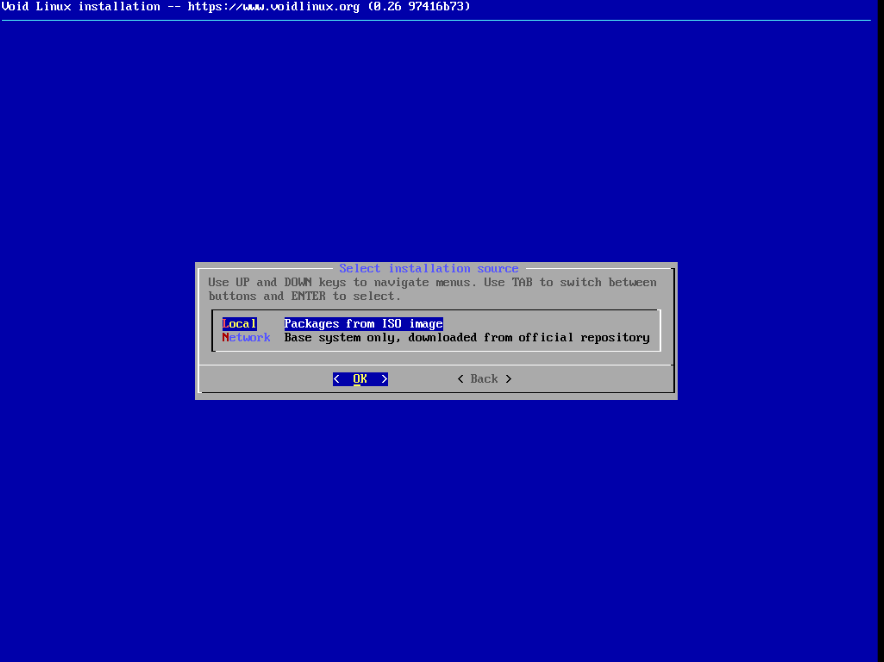
In this case it doesn't care because in this guide we are installing the base OS, but it is preferred using Local package (from ISO image), many times you cannot have access to internet and local option is highly recommended.
If you installed xfce image, it's very important use ALWAYS local packages
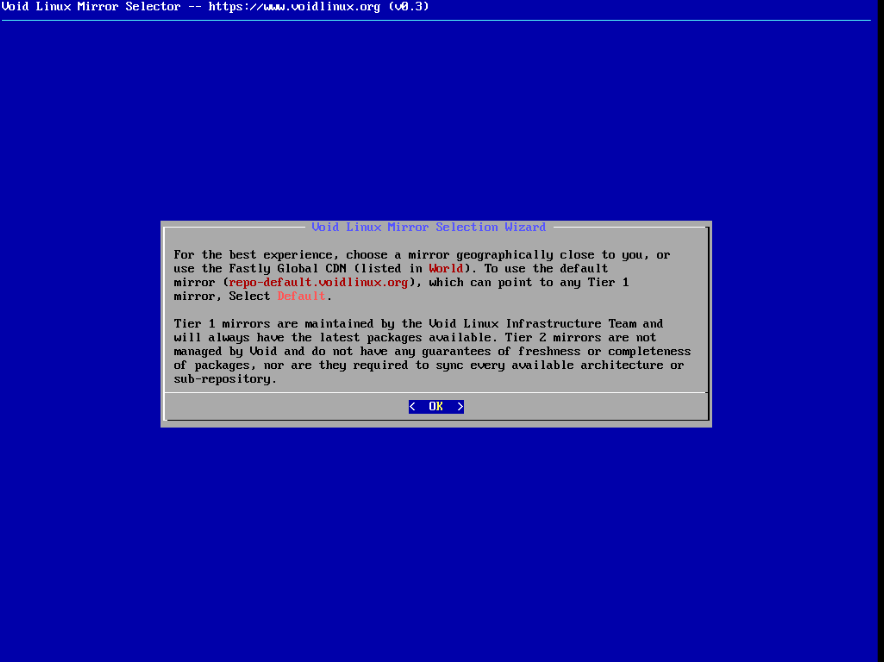
Mirror
In this step you will choose from where you want to install [XBPS packages], it's highly recommended to use the closest mirror to you and select the first one, because this mirror in all cases has the more stable and updated packages.
Hostname
The name of your machine
Locale
This set up the main language of your system
Timezone
This will set up the time of your system clock
Root password
The password of root administrator user
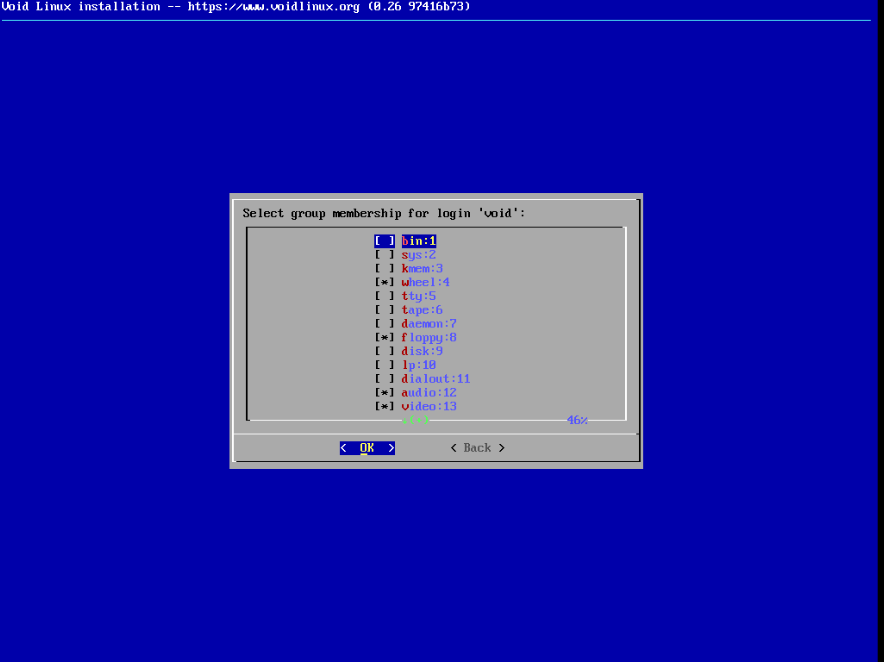
User Account
Your user and its password. In this part also you user will be added to an specific group, in this case, we will not configure anything else in this section:
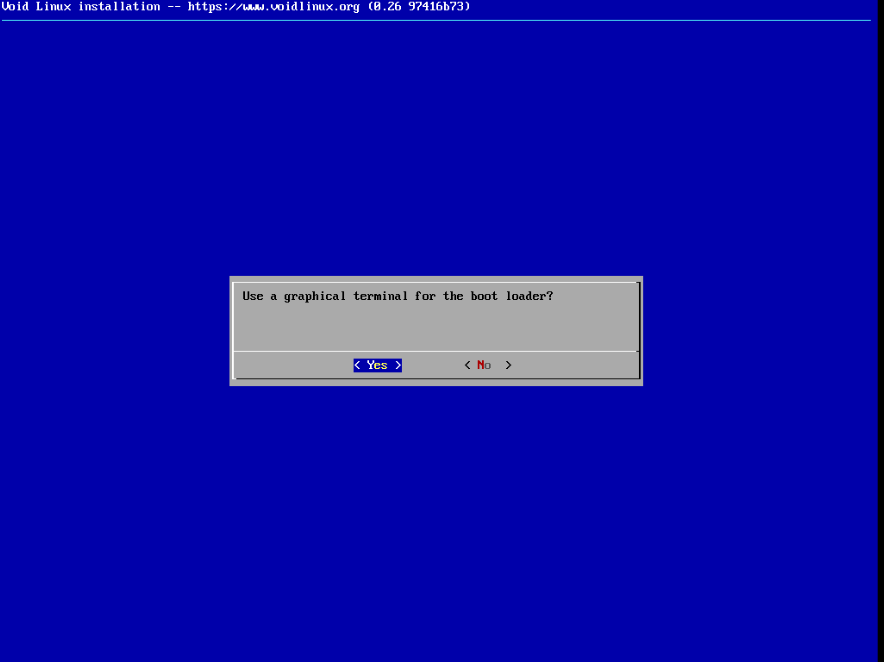
Boot Loader
In case that you desire, system can install a boot loader, it is a menu where you can choose what operative system (if you have another one) or OS option you want initialize. In this guide, we recommend you install it:
- First, select the disk where you want to install it
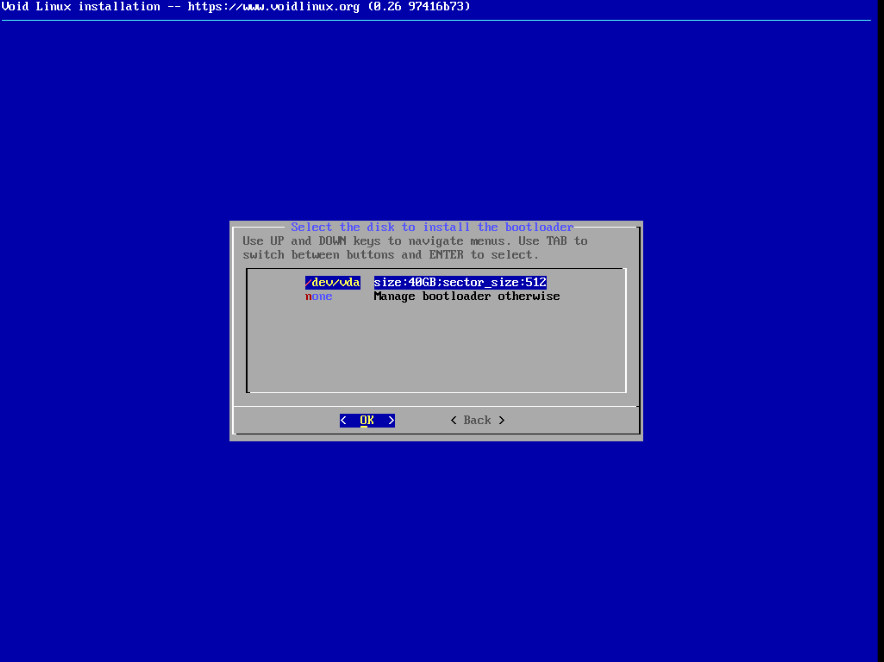
- Then, you will chose graphical option
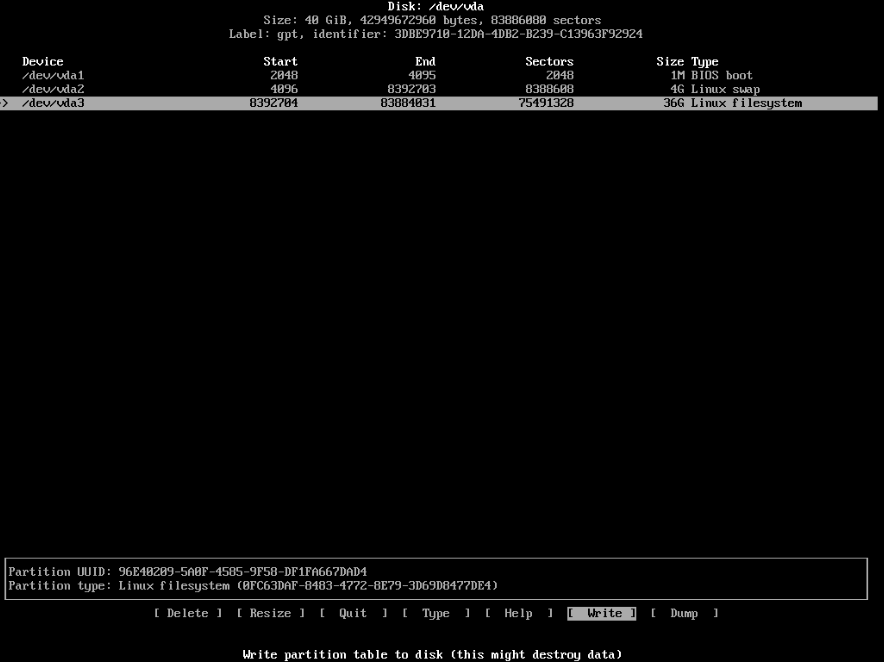
Partition table
This is one of the most important steps, if you does not know about [partitioning], we highly recommend you to know more about [file systems] and [disk partition]. Here we will select cfdisk partitioning, this is the easiest way to part a disk
We recommend to follow this layout for [EFI Systems] and [BIOS Systems]
Efi System Partition table
| File system | Size | Type |
|---|---|---|
| vfat | 200MB - 1GB | UEFI System |
| swap | 2-4GB (it depends on computer storage and RAM memory) | Linux Swap |
| ext4 | rest | Linux filesystem |
BIOS System partition table
| File system | Size | Type |
|---|---|---|
| none | 1MB-1GB | BIOS boot |
| swap | 2-4GB (it depends on computer storage and RAM memory) | Linux Swap |
| ext4 | rest | Linux filesystem |
In this example we are using a BIOS system
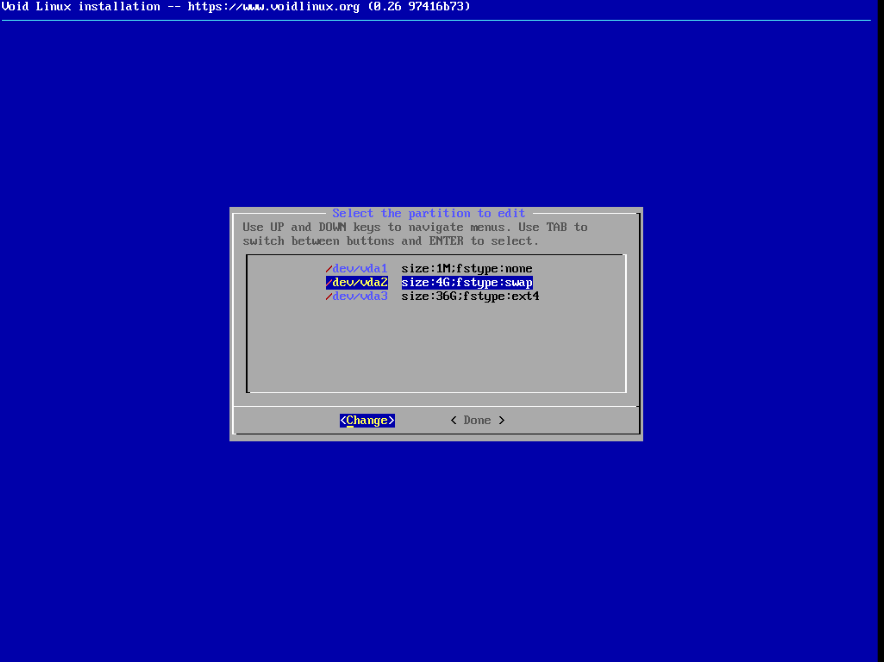
Filesystem
After the previous step, the next point to configure is the respective file systems for each partition, these have been set in each partition table. For this BIOS system example is:
After the whole installation, we will select install option at the end of the menu and we will choose accept option.
At the end, we will see something like this:
We will select OK and we will leave that by default and we will reboot or turn off the system and we will remove the installation media
Configuration
Update packages
The first thing that we need to do is updating all installed packages with this command
sudo xbps-install -Su
Void already has installed sudo package to execute commands as root .
Void Linux uses a package manager called XBPS package manager. Once we have run the command, a message will be showed:

In this case we need to run sudo xbps-install -u xbps. So now, we already can execute the previous command sudo xbps-install -Su
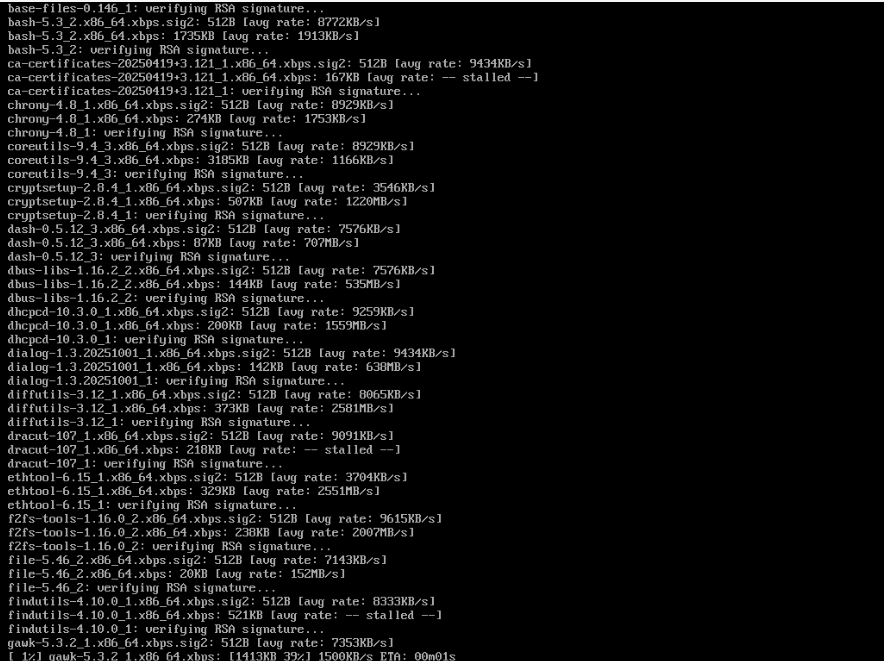
Once we accepted the update, many packages will be installed
Configure non-free repositories
If you consider necessary, you can enable easily the non-free repositories to install private software:
sudo xbps-install -Syu void-repo-nonfree
Note that this is import to be enable if you want to install private firmware (intel, amd, nvidia).
Install firmware
Now you can install the firmware for your machine. In this example we are using a intel machine, so we are going to install intel-ucode package
If you do not have an Intel machine, check here for AMD firmware and NVIDIA firmware
sudo xbps-install -Syu intel-ucode
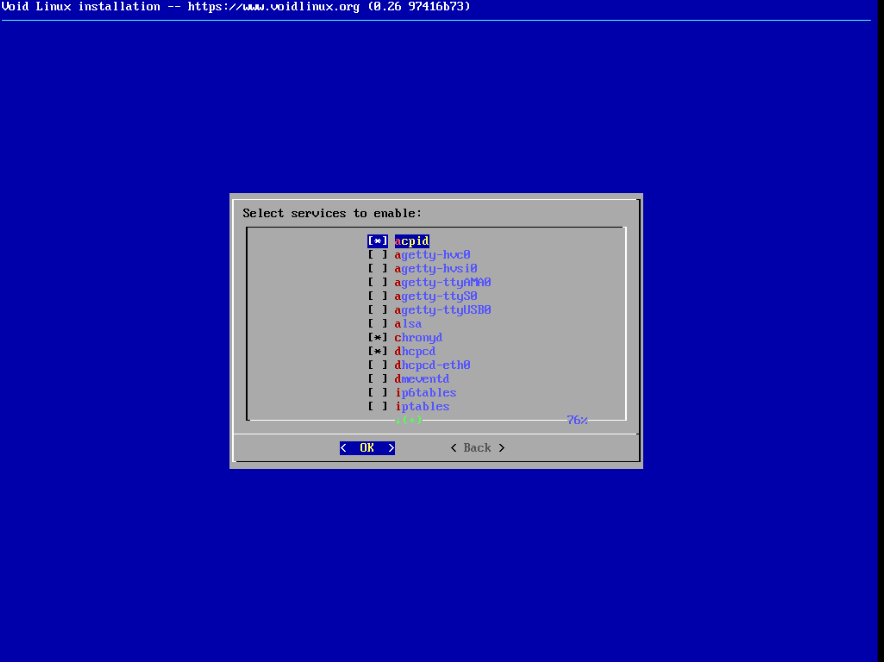
Manage services
Void Linux uses runit as service manager instead of [systemd]. To see more information about how to use it, you can visit [Services and Daemons])(https://docs.voidlinux.org/config/services/index.html). At this moment you just have to know this:
- To run and enable a service, this have to be linked to the
runsvdirdirectory. In void linux services work as directory services, this means that services can be located in their own directories, in/etc/sv/. To link a service directory with therunsvdirlocated atetc/runit/runsvdir, the user can link the service by the path/var/service/. For example, imagine that the user is not runningacpidservice, to enable this service the user has to do this:
sudo ln -s /etc/sv/acpid /var/service/
And then, the status can be checked like this:
sudo sv status acpid

Service' structure
To understand better this term, you have to know that each service in void linux has this structure:

Each service has a mandatory run file, which is in charge of run the service. Some optional files to add are the next below:
check: This executable will check whether the service is up an availablefinish: This will be run on shutdown/process stopconf: Contain environment variables to be sourced and referenced inrunexecutablelog/: This directory contain logs of run executable
When a new service is started, the supervise directory is automatically created on the first run
Basic usage
# sv up <services>
# sv down <services>
# sv restart <services>
# sv status <services>
Link a service to enable it
To enable a service, these generally are in /etc/sv/, where you can enable using:
sudo ln -s /etc/sv/<service> /var/service
If the system is not currently running, the service can be linked directly into the default runsvdir:
# ln -s /etc/sv/<service> /etc/runit/runsvdir/default/
For more information visit Services and Daemons
Set another configurations in rc.conf, rc.shutdown and core-services
rc.conf
This file is set to configure some variables from stage 1 to 3 in the runit boot and work process, this file is located in /etc/rc.conf
Sourced in runit stages 1 and 3. This file can be used to set variables, including the following:
KEYMAP
Specifies which keymap to use for the Linux console. Available keymaps are listed in /usr/share/kbd/keymaps. For example:
KEYMAP=fr
For further details, refer to loadkeys(1).
HARDWARECLOCK
Set the hardwareclock in UTC or Local time.
so if you are dual-booting with Windows, you need to either configure Windows to use UTC, or set this variable to
localtime.
FONT
Specifies which console you want to use in Linux console. Available listed in /usr/share/kbd/consolefonts.
FONT=eurlatgr
For further details, refer to setfont(8).
This information is available in the [Official Void Linux Documentation]
rc.local
Sourced in runit stage 2. A shell script which can be used to specify configuration to be done prior to login.
rc.shutdown
Sourced in runit stage 3. A shell script which can be used to specify tasks to be done during shutdown.(before to login)
core-services
Sourced in runit stage 1. A directory containing shell scripts that are run in alphabetical order when the machine boots up, before services are started. Useful for startup oneshots.
👥 Users and Groups
In void Linux you have the next commands to add, delete and modify users respectively:
useradd
userdel
usermod
The same case with user groups using the next commands:
groupadd
groupdel
groupmod
To list all user groups use:
groups
Installing a cron service
Cron is a service that allows execute commands automatically in the system. This is important to execute fstrim, in this case this last point only apply if you have a Solid State Drivers (SSD), but we recommend you do this:
sudo xbps-install -Su cronie
Next, we will enable
sudo ln -s /etc/sv/cronie /var/service
sudo sv status cronie
For SSD
If you have an SSD disk, it is important to enable a periodic executable script to TRIM the driver:
First we need to install cronie as periodic TRIM (see the previous step), now we need to write in /etc/cron.weekly/fstrim:
#!/bin/sh

fstrim /
Save and giving writing and reading allowed rules
chmod u+x /etc/cron.weekly/fstrim
App Armor
We are going to install AppArmor because we need a mandatory access control mechanism:
sudo xbps-install -Su apparmor
Now we are going to set a init command in grub to execute in the [kernel cmdline]:
Add this line to /etc/default/grub

Now we are going to reboot the system
Network Time Protocol
It is important that every system has this service to link the system clock with the network clock:
In this case that you do not have this package, we will install chrony package with chronyd service:
Before you can ensure that you don't have this service using
sudo sv status chronyd
If you received something like this, this means that you already have chrony and it does not require to be installed again:

If you do not, execute this commands
sudo xbps-install -Syu chrony
sudo ln -s /etc/sv/chronyd /var/service
sudo sv status chronyd
Kernels
Void Linux has by default the latest stable kernel which works for all DKMS modules, if you have or want to change that, visit Kernels in Void Linux
Power management
By default, acpid service is installed and enabled. This service is in charge of the basic power usages, like suspend, hibernate and power off the system.
In this guide, we recommend you to use elogind package and service, this provides the same usages, but conflicts with acpid service. To prevent conflicts, disable acpid service and change it by elogind:
#First install dbus for elogind, if you don't have it
sudo xbps-install -Syu dbus
# Enable, because it can be disabled by default
sudo ln -s /etc/sv/dbus /var/service

# Disable acpid service
sudo rm /var/service/acpid
sudo sv status acpid

# Install and activate elogind
sudo xbps-install -Syu elogind
sudo ln -s /etc/sv/elogind /var/service
sudo sv status elogind

# Install polkit to use elogind withour root rules
sudo xbps-install -Syu polkit
sudo ln -s /etc/sv/polkitd /var/service

sudo reboot
Power saving and profiles
To enable power profiles in void, by default there is any service to manage this. In this case the recommended by [Official Void Documentation] is [TLP]:
sudo xbps-install -Syu tlp tlp-rdw tlp-pd
sudo ln -s /etc/sv/tlp /var/service
sudo ln -s /etc/sv/tlp-pd /var/service
sudo sv status tlp
sudo sv status tlp-pd
To ensure that tlp is running without reboot the system, use:
sudo tlp start
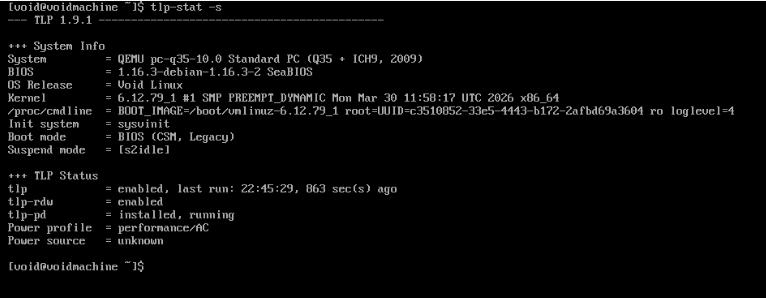
# To ensure that it is active
tlp-stat -s
You have to see something like this:
See and change the power profile
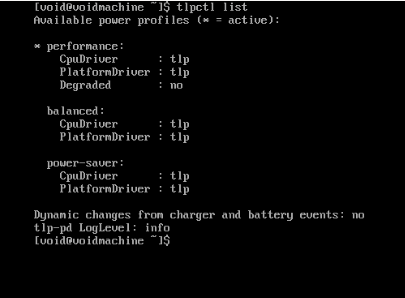
To see what power profiles are available in your pc, you can run tlpctl list:
To change the power profile execute this:
tlpctl <profile name>
# for example
# tlpctl balanced
See TLP and tlpctl documentation to know more about power profiles using TLP
Network
By default, dhcpd service is installed and enabled in void linux, in this guide we won't see much about Networking, but you can go to Official Void Documentation about networks.
Interface Names
Newer versions of udev(7) no longer use the traditional Linux naming scheme for interfaces (eth0, eth1, wlan0, ...).
This behavior can be reverted by adding net.ifnames=0 to the kernel cmdline.
Firewalls
We recommend you to use ufw package (Uncomplicated Fire Wall)
Wireless networks
wpa_supplicant
By default, void linux has wpa_supplicant. This service allows us connecting to a wireless network
iwd
This is the iwd package to connect us to a wireless network, as wpa_supplicant does. In this case we recommend you to use this package instead wpa_supplicant:
# Ensure that you have dbus service running (in case that is not running, enable)
sudo sv status dbus
# Installation
sudo xbps-install -Syu iwd
Once you installled, initialize with:
sudo ln -s /etc/sv/iwd /var/service
sudo sv status iwd
And then you can access to iwctl interface using
iwctl
You can configure the daemon creating or editing the /etc/iwd/main.conf
NetworkManager
This is a daemon in charge to manage ethernet, WiFi and mobile broadband network connections. To use it install the package:
sudo xbps-install -Syu NetworkManager
You must disable or delete the next services to make NetworkManager working properly:
wpa_supplicantdhcpcdwicd
Also ensure that you are running dbus service
Then, you will be able to enable NetworkManager service:
sudo ln -s /etc/sv/NetworkManager /var/service
Now, only users inside of network group can use NetworkManager
This service comes with nmcli, a command line tool, and a text-based user interface nmtui, to control network settings.
To use Eduroam visit this website.
Network Filesystems
(Missing, this is coming soon).
Session and Seat management
Elogind
AT this point, in this guide we installed elogind as power manager and, also, it works as a session and seat manager.
It is very important to understand that to make elogind working properly, you HAVE to be enabled dbus service
Dbus
Dbus is the services in charge to manage issues related with elogind service ans graphical sessions. You can use dbus-run-session to start a graphical environment
dbus-run-session <session>
# for example: dbus-run-session sway
Graphical Session
Graphics Drivers
Intel
Intel supports linux-firmware-intel, normally, it is already installed as package
sudo xbps-install -Syu mesa-dri vulkan-loader mesa-vulkan-intel intel-video-accel
This will install all the Intel VA-API drivers. intel-media-driver will be used by default, but this choice can be overridden at runtime via the environment variable LIBVA_DRIVER_NAME:
| Driver Package | Supported GPU Gen | Explicit selection |
|---|---|---|
libva-intel-driver |
up to Coffee Lake | LIBVA_DRIVER_NAME=i965 |
intel-media-driver |
from Broadwell | LIBVA_DRIVER_NAME=iHD |
Wayland
In this guide, we are going to use Wayland as graphical server, so in this case we installed wayland packages:
sudo xbps-install -Syu dejavu-fonts-ttf xorg-fonts noto-fonts-ttf noto-fonts-cjk noto-fonts-emoji nerd-fonts qt5-wayland qt6-wayland kwayland firefox alacritty sway
Fonts
This part is very important, all desktop environments comes with fonts, and many times these come with fonts as related packages and are installed, but if you are using a Window Manager as Sway or i3, you will need to install fonts to customize correctly the interface
In the previous step we already installed fonts. If a font is not available via xbps packages you can install fonts manually and set in /usr/share/fonts, or ~/.local/share/fonts (per user).
To customize font display in your graphical session, you can use configurations provided in /usr/share/fontconfig/conf.avail/. To do so, create a symlink to the relevant .conf file in /etc/fonts/conf.d/, then use xbps-reconfigure to reconfigure the fontconfig package.
For example, to disable use of bitmap fonts:
# ln -s /usr/share/fontconfig/conf.avail/70-no-bitmaps-except-emoji.conf >/etc/fonts/conf.d/
# xbps-reconfigure -f fontconfig
Use fc-conflist(1) to list which configurations are in effect.
ICONS
By default, many applications based on gtk+3 use adwaita-icon-theme, so:
If you wish to use a different theme, install the relevant package, then specify the theme in
/etc/gtk-3.0/settings.inior~/.config/gtk-3.0/settings.ini.adwaita-icon-themecan be removed after ignoring the package.
XDG-Desktop-Portals
SOme applications in Linux, mainly flatpak apps use xdg-desktop-portals to access various system interfaces (dialogs, notifications, etc) so it is important to install that.
Installation
XDG Desktop Portals require a user D-Bus session bus. Install xdg-desktop-portal and one or more backends:
| Backend | Notes |
|---|---|
xdg-desktop-portal-gnome |
Provides most common and GNOME-specific interfaces (GTK+ UI) |
xdg-desktop-portal-gtk |
Provides most common interfaces (GTK+ UI) |
xdg-desktop-portal-kde |
Provides most common and KDE-specific interfaces (Qt/KF5 UI) |
xdg-desktop-portal-lxqt |
Only provides a file chooser (based on libfm-qt) |
io.elementary.files |
Only provides a file chooser |
xdg-desktop-portal-wlr |
Only provides a screenshot and screencasting interface for wlroots compositors |
If unsure what to choose, xdg-desktop-portal-gtk is a good default choice.
sudo xbps-install -Syu xdg-desktop-portal-gtk
Configuration
The default configuration can be seen in /usr/share/xdg-desktop-portal/portals.conf
If necessary, this configuration can be overridden for specific desktop environments and portal interfaces by creating $XDG_CURRENT_DESKTOP-portals.conf or portals.conf at the system or user level as described in portals.conf(5).
Multimedia
This configuration is to set up audio in Void Linux. The most recommended are PulseAudio or PipeWire, For closed source applications, PulseAudio is more recommended based on [Void Linux Docs], but PipeWire provides a drop-in replacement for PulseAudio.
The elogind package is not installed and enabled, it is necessary to set up audio
it is necessary to be in the audio group in order to have access to audio devices.
ALSA
To make work properly and set up the audio, we need this package
sudo xbps-install -Syu alsa-utils
Pipewire
In this guide, we use pipewire as audio server,
Prerequisites
- You need to have installed
dbusservice - Also requires
XDG_RUNTIME_DIRenvironment variable to be defined in your environment to work
If not using elogind, it is necessary to be in the audio group to access audio devices and the video group to access video devices.
Installation
sudo xbps-install -Syu pipewire
This will also install a PipeWire session manager, wireplumber.
Session Management
In PipeWire, a session manager assumes responsibility for interconnecting media sources and sinks as well as enforcing routing policy. Without a session manager, PipeWire will not function.
With the previous session manager installed, we can configure PulseAudio. In resume, a session manager is going to need be launched by PipeWire. To commit this, we will execute these lines:
# mkdir -p /etc/pipewire/pipewire.conf.d
# ln -s /usr/share/examples/wireplumber/10-wireplumber.conf /etc/pipewire/pipewire.conf.d/
The first one creates pipewire.conf.d, this directory is created to configure pipewire. The second line creates a link to that directory from wireplumber, more exactly from its config directory. This is a system-wide configuration, but you only can use the per-user configuration.
PulseAudio Interface
PulseAudio iterface is optional but is highly recommended by Official Documentation, se we are going to install that.
# mkdir -p /etc/pipewire/pipewire.conf.d
# ln -s /usr/share/examples/pipewire/20-pipewire-pulse.conf /etc/pipewire/pipewire.conf.d/
In this case we created a link from 20-pipwire-pulse.conf to pipewire.conf.d. In this way, we already will have PulseAudio interface configurated successfully in a system-wide way.
You also can make a per-user config, but in this guide we onl cover a system-wide way, if you are interested in a per-user configuration, we recommend you to visit The offcial Void Linux Documentation
Testing
To ensure that you have correctly done you configuration, please, run this two commands:
Once you have installed and configured all, at the first time you will need to run manually pipewire, we later will agree this command to our config file where our Window Manager starts
pipewire
After that, you will run this command
wpctl status
You will be able to see something like this (if all is already and set successfully)
PipeWire 'pipewire-0' [0.3.82, ...]
[...]
Also we will ensure that pulseaudio interface has been set successfully using:
pactl info
You should see something like this:
[...]
Server Name: PulseAudio (on PipeWire 0.3.82)
[...]
Set Launching automatically
There are many ways, in this guide, we are using sway as window manager, so, we will use the Start Script which comes with this and initializing.
You will be able to find this script in etc/sway/config
We highly recommend you copy this file to `~/.config/sway/
We will se later how we can configure
Optional (but recommended) set up
Command Line and terminal interfaces
pw-cli, pw-top and pw-cat are tools which comes with pipewire.
wpctlcan be used to control the WirePlumber session manager- In this guide we configured
PulseAudiointerface, so you can also usepactlfrompulseaudio-utilsandncpamixer
Graphical Interfaces
If you are not using Pulse Audio interface qpwgraph and helvum provide a node-and-graph-style interface for connecting applications and devices.
Recommended
In this guide we are using pulseAudio interface, so you can use pavucontrol, pavucontrol-qt, and widgets from other desktop environments to control audio
Bluetooth Audio
Install libspa-bluetooth package.
ALSA Integration
Install alsa-pipewire, and then enable with:
# mkdir -p /etc/alsa/conf.d
# ln -s /usr/share/alsa/alsa.conf.d/50-pipewire.conf /etc/alsa/conf.d
# ln -s /usr/share/alsa/alsa.conf.d/99-pipewire-default.conf /etc/alsa/conf.d
JACK interface
Install libjack-pipewire.
Use pw-jack(1) to launch JACK clients manually:
$ pw-jack <application>
Bluetooth
Use rfkill to check an remove if there are any blocks
If Bluetooth is blocked, use this
$ rfkill
ID TYPE     DEVICE      SOFT      HARD
0 wlan      phy0   unblocked unblocked
1 bluetooth hci0     blocked unblocked

# rfkill unblock bluetooth
Installation
sudo xbps-install -Syu bluez
sudo ln -s /etc/sv/bluetoothd /var/service
sudo sv status bluetoothd
then add your user to the bluetooth group and restart dbus service, or reboot the system.
To use wireless speaker or any other similar device, you may need to install bluez-alsa
In this guide, we are using pipewire, so we need to install libspa-bluetooth
You can manage using bluetoothctl, consult Arch Wiki to know how you connect a device using the command line interface.
Configuration
The main configuration file is /etc/bluetooth/main.conf.